Running multiple build agents in TeamCity
Some notes for my colleagues for when I’m not around to manage the pipeline.
For various reasons, mostly lack of time, we have been using just one build agent on our build machine. What a build agent is? Well, on our build machine we run an integration service called TeamCity. This service listens for changes in our GitHub repository and starts some processes when we check in changes. The process is what we refer to as a build configuration(s), and each contains a set of build steps. Think of build steps as ‘jobs’. We used to do this:
On change in the repo (or if triggered manually) we would start the build configuration for our backend services. The things we would do was set the version number, compile the libraries, create deployment packages. If everything went well we would proceed with running our unit tests and integration tests (as a separate build configuration- just think of that as a way of grouping related jobs). If everything passed we would build the client, and if all that was good run the client tests. At the end, we would push the deployment NuGet packages to out deployment service, Octopus.
This is how the chain looked like (simplified):
VCS trigger => Build backend => run tests => build client => run tests => push to Octopus
A build agent is what runs the build steps. And as we only used one it could just run them sequentially, and that would take a fair bit of time. What we have done now is change the build chain and installed more agents, and the client and backend services build steps are run in parallel as the client and backend services and tests are independent of each other. The push to Octopus is only made when and if all the prior builds are successful.
Adding several agents can be a bit tricky (unless somebody has a secret trick), here are the steps:
- Download the Windows installer
- Set a new path for the build agent, as well as a new port.
For example, we use: C:\TeamCity\buildAgent1 and C:\TeamCity\buildAgent2
Before we register and start the build agent as a Windows service we need to set some properties- as they all get the same defaults which means that you will only override an existing agent if you don’t. So set a new:
- Name
- Port
This is set here: C:\TeamCity\buildAgent1\conf\buildAgent.properties
And for the service running the agent a new: - Name
- Title
- Description
- Displayname
This is set here: C:\TeamCity\buildAgent1\launcher\conf\wrapper.conf
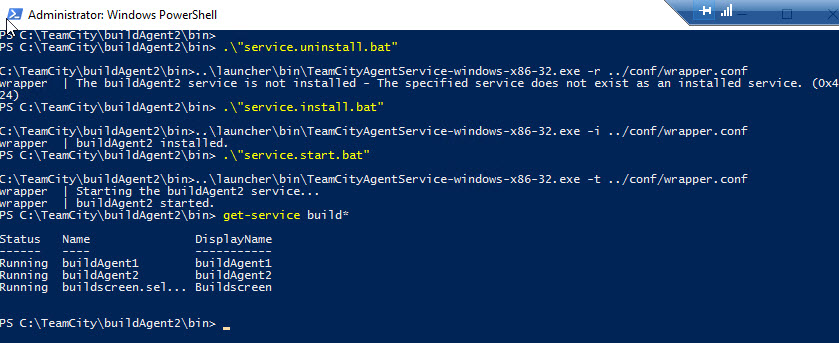
Once you have set the properties you got to install, register and start the service.
The bat files that does that are found here:
C:\TeamCity\buildAgent1\bin
Start by uninstalling if the agent is already running, then install, register and start the agent service.

You might have to restart the TeamCity service for the changes to take affect (but shouldn’t be necessary).
In TeamCity verify that you can see the agents and that they are compatible with the build configurations.
Comments
Interesting, so in order to run multiple agents you need to install the same thing multiple times?

I haven't ever used TeamCity but I got curious because it seems like a workaround around a problem that should be trivial (running the same executable multiple times). Or maybe is it that you install it once and make a copy of the directory (which kinda turns the installer into glorified unzipper).

I hope my question isn't too dumb :D
Last modified on 2018-04-18
